Audiosdroid Tutorial (Please see the video and text tutorial below.)
FAQ : I noticed there's a delay in between my voice recording & the beat or music in Audiosdroid. How do I correct this issue?
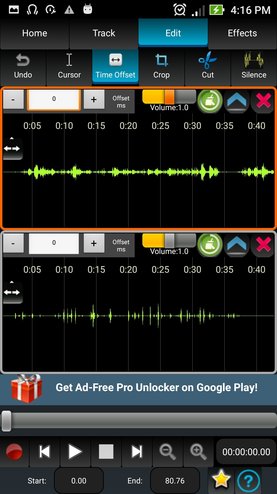
You can use Time Offset tool in order to sync tracks. There will be always a delay in Android system. You can correct this delay easily with Time Offset tool or entering offset value in milliseconds in the edittext at the top of the track.
You can also try to select the Recorder v1 or Recorder v2 if there are skips or sample rate difference between tracks. Please try to close background apps. Android 4.2 - 5.0 has a general audio latency which is solved with Android 6.0 You can look through the following tutorial to use time shift tool. Please also watch the tutorial video on Youtube.
You can also try to select the Recorder v1 or Recorder v2 if there are skips or sample rate difference between tracks. Please try to close background apps. Android 4.2 - 5.0 has a general audio latency which is solved with Android 6.0 You can look through the following tutorial to use time shift tool. Please also watch the tutorial video on Youtube.
Audiosdroid Description & Tutorial
- Professional and the easiest Digital Audio Workstation (DAW), sound & music recorder, editor and mixer
- Edit & mix MP3, MP4, WAV, AAC, and AMR audio files
- Create audio files, ringtones, alarms, and notifications in mp3 & wav format
- Add new tracks, mix the tracks and save the mixed audio file in mp3 & wav format
- Record audio with your device microphone and mix the recorded audio file with other audio tracks
- Share your recorded or mixed audio files with Whatsapp, ChatOn, Email, Bluetooth, Wifi, Google Drive, and Dropbox
- Karaoke with your favorite songs
- Play the song you want to accompany, start recording, and sing!
- Add background audio or music to your voice or any sound
- Audio studio is in your Android phone & tablet.
If the app stops working or you get error while mixer, please try to remove unnnecessary temporary audio files on the Audiosdroid and Audiosdroid/Temp folder and other unused files your device storage.
- Edit & mix MP3, MP4, WAV, AAC, and AMR audio files
- Create audio files, ringtones, alarms, and notifications in mp3 & wav format
- Add new tracks, mix the tracks and save the mixed audio file in mp3 & wav format
- Record audio with your device microphone and mix the recorded audio file with other audio tracks
- Share your recorded or mixed audio files with Whatsapp, ChatOn, Email, Bluetooth, Wifi, Google Drive, and Dropbox
- Karaoke with your favorite songs
- Play the song you want to accompany, start recording, and sing!
- Add background audio or music to your voice or any sound
- Audio studio is in your Android phone & tablet.
- New feature : We added the feature of applying effect on the selected part of a track. You can apply the effect to the selected part using Edit -> Effect button.
If the app stops working or you get error while mixer, please try to remove unnnecessary temporary audio files on the Audiosdroid and Audiosdroid/Temp folder and other unused files your device storage.
The functions of icons and menu buttons
|
|

|
|


|
|

|
|


|
|


|
|
|
|
|


|
|


|
Zoom In: Zoom in to the audio track in order to see the waveform in detail.
|

|
Zoom Out: Zoom out the audio track in order to see the longer time portion of the waveform.
|
|
|


How to use Audiosdroid Audio Studio?
Audiosdroid Audio Studio is an user-friendly and easy to use app.
First open the audio files that you want to mix. Audiosdroid supports multiple tracks. You can open/record audio for each track. Click open button in order to open audio for the track by using file browser or music library.
First open the audio files that you want to mix. Audiosdroid supports multiple tracks. You can open/record audio for each track. Click open button in order to open audio for the track by using file browser or music library.
You can add new tracks from menu and the open the audio file for each new track. You can also remove tracks.
You can use time shifting tool in order to sync the tracks. For example you can sync a music with your voice by selecting the time shifting tool, then moving the wave left or right. You can zoom in/zoom out for better editing. You can crop the audio file in order to remove unnecessary parts. You can preview your project by playing it.
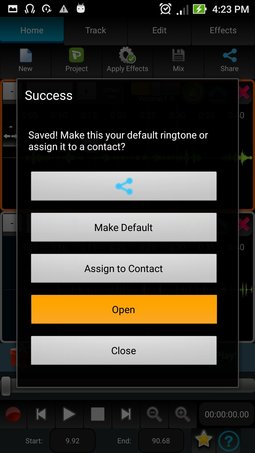
After editing your project, you can mix the tracks. Files are saved on Audiosdroid folder on the sd card. You can give a name to the output file as you want with .mp3 extension. After saving the audio file, you can open it on Audiosdroid and share it on social media, Whatsapp, Google Drive, email. If you have any questions/problems, please send email to [email protected] or fill in the contact form below. If you are unsatisfied with the app, please first send your feedback to the developer.
A Simple Project Tutorial Step by Step
|
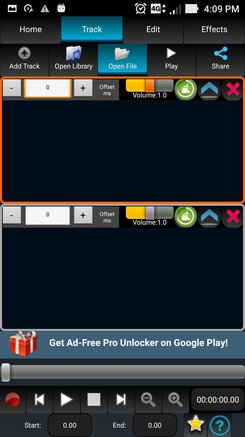
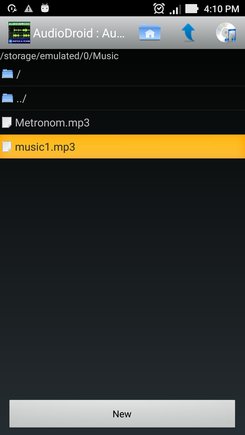
STEP 1 : Please select Track 1. Then select the Track menu tab and click the Open File or Open Library button. Open File button launches file explorer, Open Library button launces Music Library.
|
|
|
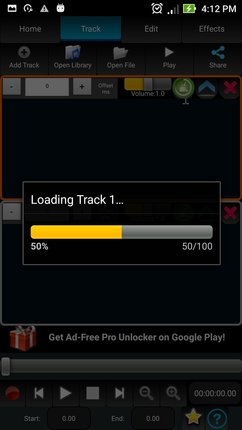
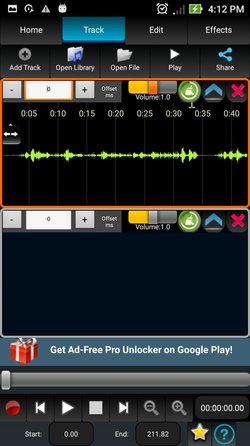
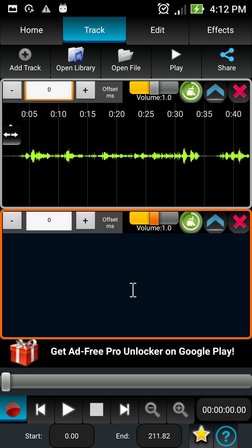
STEP 4 : Selected audio is opened on the Track 1, which is the selected track.
|
STEP 5: Select Track 2 by tapping on that. The selected track has red frame.

|
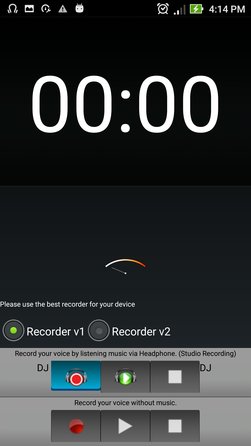
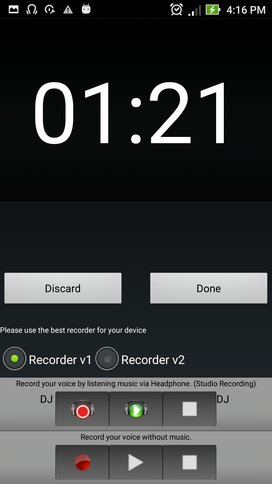
STEP 6: Click on the Record button to record audio for the selected track, which is Track 2.
|
|
STEP 7 : Plug-in your headphone (optional). Start recording your voice while listening the Track1 by clicking Record DJ button.
|
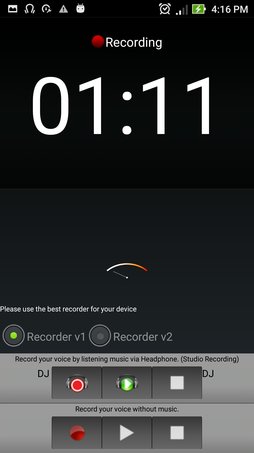
STEP 8 : Your voice is being recorded.
|
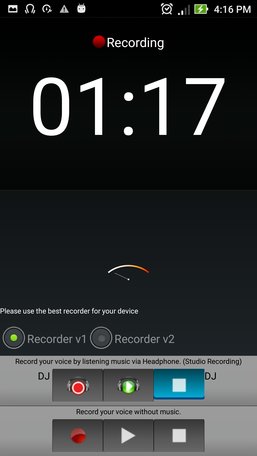
STEP 9: Click on the Stop button to stop recording.
|
|
STEP 10 : Click Done button to save your recording to /sdcard/AudioDroid/Rec folder and open it on the selected track, which is Track 2.
|
STEP 11 : Your recording is automatically opened on Track 2.
|
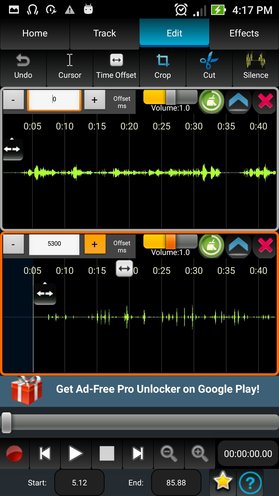
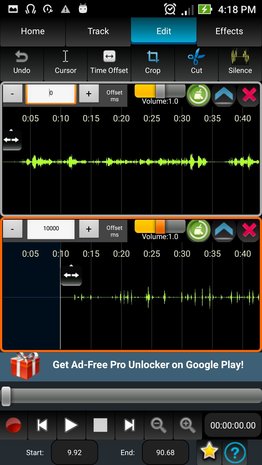
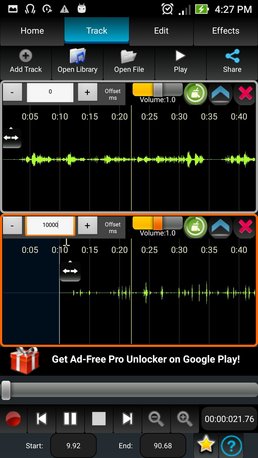
STEP 12: Time shift tool is used for setting time offset to Track 2 for syncing wth Track 1. You can use the plus and minus buttons of offset number picker to set the time offset, enter number or move the waveform left or right when the Time Shift Tool is selected.
|
|
STEP 15: Time offset of Track2 is set to desired value for syncing with Track1. You can use Time Offset tool in order to sync tracks. You can correct this delay easily with Time Offset tool or entering an offset milliseconds (ms) value.
|
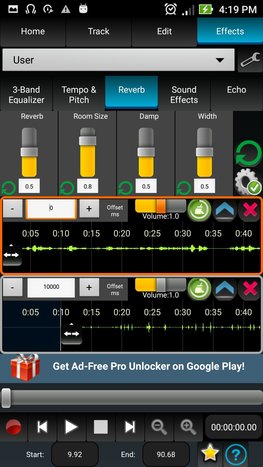
STEP 14 : Click on the Effects Tab to apply Equalizer, Tempo & Pitch, Reverb, Sound Effects and Echo to the selected Track.

|
STEP 15: Reverb value is set for Track1.
|
|
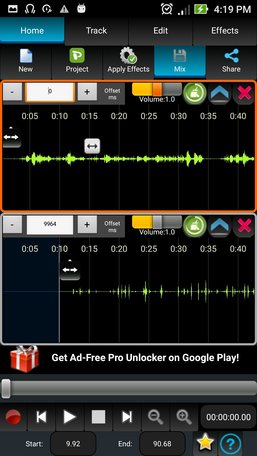
STEP 16: The project is previewed by clicking the play button. You can save the project by clicking the Project on the Home menu tab if you buy the Pro version.
|
STEP 17: You can mix Track1 and Track2 by clicking the Mix button on the Home menu Tab.
|
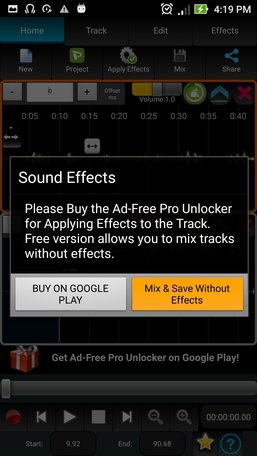
STEP 18: If you buy the Pro version, you can apply offline effects to the tracks while mixing. If you don't want to get Pro version please click Mix & Save Without Effects button.
|
|
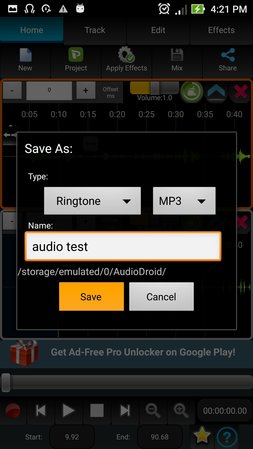
STEP 19: Please type a name for your mixed output file or leave the default name. Then click on the Save button.
|
STEP 20: Track1 and Track2 are mixed and saved as MP3. Please wait while the audio is being saved.

|
STEP 21: The mixed audio file can be opened on the Track 1. It can also be shared via Whatsapp, E-Mail, Messaging Apps, Google Drive etc and made ringtone and assigned to contact.
|
|
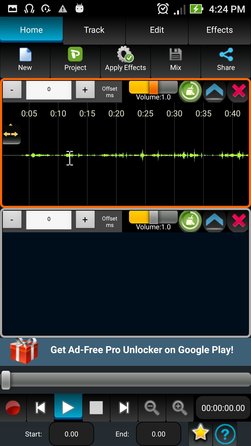
STEP 22: The mixed audio file is opened on Track1.
|